Post by boyblunder on Aug 21, 2005 0:24:20 GMT -5
Just some prepping. You will need to cut out the 3 posts on the underside of the shoulder piece to allow the new cape to fit properly.

This is how the material will most likely look after being liberated from the umbrella. Just remember that the cape at its widest point (shown here) should be equivalent to twice the height of your figure from foot to the base of the neck post PLUS the width of the neck post. It is important to iron (low heat pls!) a crease down the center of the material (don't forget this!)

Next fold the cape like so and cut off everything below the green line.

Next, join the two front sides of the cape right where the red dot is. Make sure not to involve the material behind it when stitching! Fit this onto your figure to see how it fits with the neck post. Next, stitch the front and back portion of the cape as indicated by the blue lines (reverse-stitch if desired). They are slightly higher than the red dot. Make sure to leave a space for your neck post to fit through. you will need to cut a small amount of material (indicated by the green curve) for a proper fit. Remember to fit after every step. And when in doubt go slow and cut only half of what you re aiming for...its hard to put material back once its been trimmed off! Cut the ends of the cape in a scalloped fashion. note: smaller arcs for an older cape design and bigger shallower ones for the ala-Jim Lee version.

Remember to always fit after each step! (Not the revers-stitch on this sample) Fit on the head and shoulder assembly. At this point the cape will look like a rain poncho..stop here if so desired.

Finally take the ends of the poncho on either side and fold them in at the points (in yellow) making small stitches by the small of the figures back (in red). Notice how the center crease allows some play in the material whilst taking up some slack. You are now done with your Boy Blunder style cape!

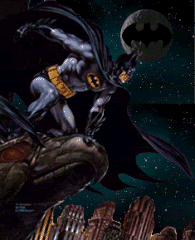
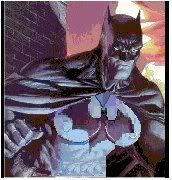
Top off with a prepainted Hush Batman head from DCD (if so desired). Enjoy! Here are some pics of the finished figures.


This is how the material will most likely look after being liberated from the umbrella. Just remember that the cape at its widest point (shown here) should be equivalent to twice the height of your figure from foot to the base of the neck post PLUS the width of the neck post. It is important to iron (low heat pls!) a crease down the center of the material (don't forget this!)
Next fold the cape like so and cut off everything below the green line.
Next, join the two front sides of the cape right where the red dot is. Make sure not to involve the material behind it when stitching! Fit this onto your figure to see how it fits with the neck post. Next, stitch the front and back portion of the cape as indicated by the blue lines (reverse-stitch if desired). They are slightly higher than the red dot. Make sure to leave a space for your neck post to fit through. you will need to cut a small amount of material (indicated by the green curve) for a proper fit. Remember to fit after every step. And when in doubt go slow and cut only half of what you re aiming for...its hard to put material back once its been trimmed off! Cut the ends of the cape in a scalloped fashion. note: smaller arcs for an older cape design and bigger shallower ones for the ala-Jim Lee version.
Remember to always fit after each step! (Not the revers-stitch on this sample) Fit on the head and shoulder assembly. At this point the cape will look like a rain poncho..stop here if so desired.
Finally take the ends of the poncho on either side and fold them in at the points (in yellow) making small stitches by the small of the figures back (in red). Notice how the center crease allows some play in the material whilst taking up some slack. You are now done with your Boy Blunder style cape!
Top off with a prepainted Hush Batman head from DCD (if so desired). Enjoy! Here are some pics of the finished figures.

 Thank you